")
A practical, field-tested guide for contractors and site teams: choose the right subframe, set joist spacing,
allow expansion, and lock boards with hidden fasteners—so your composite decking looks sharp and stays stable for years.
1) Subframe Options (Pros & Cons)
| Subframe | Where It Shines | Watch Outs |
|---|---|---|
| Pressure-treated timber | Ground decks, budget-sensitive builds, easy to cut on site. | Moisture & rot risk without ventilation; keep off soil, use pads/footings, seal end-grain. |
| Aluminum joists/rails | Rooftops/balconies with pedestals, precise spans, lighter weight, straightness. | Thermal expansion of boards vs. metal—respect gaps; isolate from dissimilar metals if near salt. |
| Galvanized steel | Heavy-duty/public decks, long spans. | Weight, thermal bridging, corrosion near coasts unless protected; accurate fixing required. |
| Adjustable pedestals | Level over waterproof membranes; fast height correction; good airflow and drainage. | Check pedestal load ratings and spacing; lock rails against wind uplift/perimeter movement. |
See real assemblies in our Project Gallery.
2) Joist Spacing, Spans & Orientation
- Standard spacing: For most residential walking loads, plan joists at 300–400 mm (12–16″) centers. Reduce spacing for diagonal installs, commercial traffic, or heavy planters.
- Board span direction: Run boards perpendicular to joists. For herringbone/chevron, insert blocking at changes of direction.
- Overhangs: Keep board end overhang within manufacturer limits (often ≤ 40 mm / 1.5″). Support fascia with dedicated trims or secondary rails.
- Stairs: Treat each tread as a mini-deck; add a joist/stringer under every board edge; use bullnose/edge profiles for nosing.
For product-specific spans, check the Ecosolid Decking Series page and our FAQ.
3) Expansion Gaps & Ventilation
- Side gaps: Keep clip-controlled gaps between boards (typically 4–6 mm) to shed water and allow swelling/shrinkage.
- End gaps: Leave larger gaps at board ends based on install temperature; allow perimeter clearance at walls and copings.
- Ventilation: Maintain airflow under deck (≥ 50 mm void where possible) and keep geotextile/gravels clear of joist bottoms.
- Drainage: Design falls (≈ 1–2%) toward channels; never block outlets with joists/pedestals.
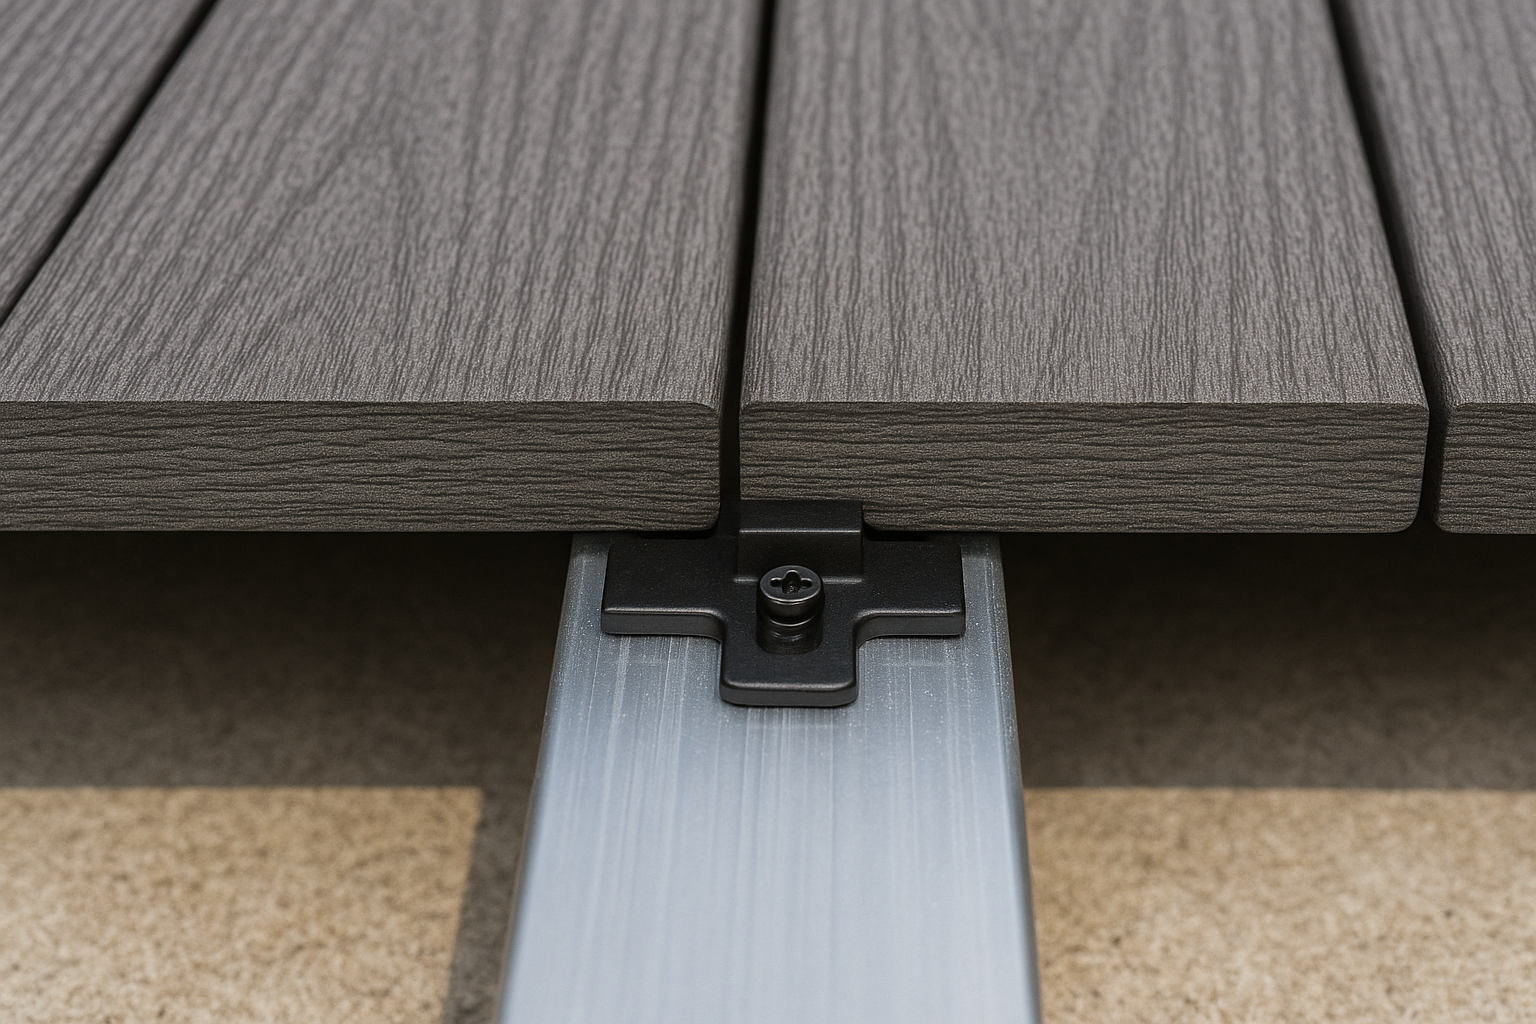
4) Hidden Fasteners & Edge Finishing
Hidden Clip Systems
- Starter/end clips: secure the first and last board without visible screws.
- Standard clips: maintain uniform side gap; stainless hardware recommended for coastal/tropical sites.
- High-grip options: use near stairs/ramps or high-traffic runs.
Face-Screwing (When Needed)
- For picture-frame borders or repairs, pre-drill/countersink; keep distances from edges and use color-matched heads.
Edges & Fascia
- Finish exposed ends with fascia, L-trims, or bullnose. Seal cut edges per guidance.
- Keep trims clear of drainage paths; avoid sharp external corners (barefoot comfort).
5) Ground vs. Rooftop Install Nuances
- On ground: use weed-suppressing membrane + gravel for drainage; raise timber off soil with pads; ventilate.
- On rooftops/balconies: protect membranes; use pedestals/rails; verify wind-uplift restraint and door thresholds. See News for rooftop guidance and Sustainability notes.
6) Tools, Checks & Handover
- Must-have tools: track saw or mitre saw (fine tooth), impact driver, spacer set, level/laser, pedestal keys, stainless bits, rubber mallet.
- Quality checks: straight string lines, consistent gaps, secured perimeter, clean drains, tidy cut ends aligned with trims.
- Client handover: show cleaning routine (neutral-pH wash, soft brush), and warranty registration for fade & stain.
Common Mistakes (Avoid These)
- Skipping expansion gaps or mixing fastener types on the same run.
- Blocking drainage outlets with joists/pedestals; no falls to channels.
- Fixing directly through waterproof membranes.
- Face-screwing without pre-drill/countersink near board edges.
- Zero ventilation under ground-level decks.
Spec & Buy Links
- Composite Decking — Ecosolid Series
- All Products including
Grille Panel and
Wall Panels - Background & policies: About Us · Why CopoSurface · Privacy Policy · Partner With Us
FAQ
What joist spacing should I use for diagonal boards?
Reduce spacing by roughly 10–20% vs. straight runs (e.g., move from 400 mm to 300–350 mm centers) and add blocking at pattern changes.
Can I install boards tight to a wall or coping?
No—always allow perimeter clearance for expansion and cleaning access. Use trims to hide the gap if needed.
Which screws/fasteners are best near the sea?
Use stainless steel hardware and isolate dissimilar metals where appropriate. Rinse hardware during routine cleaning.

